My kitties like to sit at the patio door and sun themselves, and watch the birds and squirrels that come by. The birds don’t come very often though so I thought I’d put a bird feeder.
I then ran into the problem of trying to find a bird feeder that would work in our backyard. I didn’t want to nail anything to our fence or to the outside of our house in case it was against the HOA rules. We don’t have much dirt either so I couldn’t use one of those bird feeders that sits on a stake. What I really needed was a standalone bird feeder that could go on cement. I decided it wouldn’t be that hard to make one, so after a quick Target and Home Depot run, and a couple hours of work, I’d made my own standalone bird feeder.
Materials:
- a. 8″ diameter terra cotta pot – any size that looks stable enough to support 3 bowls will work
- b. 36″ long 3/8″ diameter threaded zinc rod – make sure to get the zinc rode and not the stainless steel one as that one is 3x as expensive
- c. 3 plastic bowls
- d. 8 3/8″ wingnuts – these come 3 wingnuts in a bag at Home Depot so I got 3 bags
- e. 6 3/8″ washers – these need to fit onto the threaded rod
- f. 2 3/8″ x 1-1/2″ Fender Washers – these need to fit onto the threaded rod and be big enough to cover the hole in the terra cotta pot
- g. clear caulking – if you want to turn one of the bowls into a bath
Not pictured: a drill and a 3/8″ drill bit
My total spent on supplies came out to about $26, including getting a 3/8″ drill bit because I didn’t have one of that size already.

Assembly Instructions:
The first step is to drill holes in the 3 bowls. For 2 of the bowls, you want the holes to be in one of the corners and on the 3rd bowl, the hole should be in the middle. You want to make sure there is room for the smaller washer to sit flat so I placed a washer and wingnut in the bowl to figure out positioning and then marked where to drill with a pencil.
Mark 2 of your bowls in the corner.

Mark 1 bowl in the center.

Drill a 3/8″ hole in each bowl where you marked. I find what works best for me is to start with my smallest drill bit and drill a small pilot hole. I then work my way up to the size hole I need, using progressively bigger drill bits. Any method works, as long as you get a 3/8″ hole into each bowl.

Now it’s assembly time!
Start with the base which is the terra cotta pot turned upside down. Wind a wingnut and one of the large washers onto the rod. You want the wingnut to be placed at about the same height as your pot.

Put the rod through the hole in the pot.

Place your pot with the open end down and make sure that it sits flat. Adjust the wingnut if your pot is not sitting flush with the ground.
Now place the other large washer on top of the pot and wind a wingnut down the rod to clamp the rod to the pot. This takes a while because the rod is pretty long, so watch some tv while doing this part. =)
Tighten the wingnuts and make sure the rod is secured to the pot.

Now you need to do the same process to add the bowls. Take a wingnut and wind it down the pole until it is about 10″ above the pot. Make sure your wingnut’s ‘wings’ are facing down. Place a washer on top.

Place one of the bowls with a hole in the corner on top, lay down another washer, and screw on a wingnut to secure the bowl.

And your first bird feeder bowl is now attached.

Repeat the process with the other bowl with a hole in the corner, placing it about 10″ above the first bowl.
At this point, your cat will probably decide he needs to investigate what is going on…

The last bowl, the one with the hole in the center, goes on the very end of the rod. I had to put the bird feeder on the ground at this point because I couldn’t reach the top of the rod.

And here comes the other cat to check out what’s going on…

If you want one of your bowls to be a bird bath, you’ll need to seal the bolts to prevent water from leaking out. Open your caulking tube and cover the bolt above and below with caulking. I used a toothpick to smooth it out a little.
I like to use clear drying caulking because I can tell when it’s completely dry. I would suggest spreading yours a little thinner than I did because mine took forever to dry.


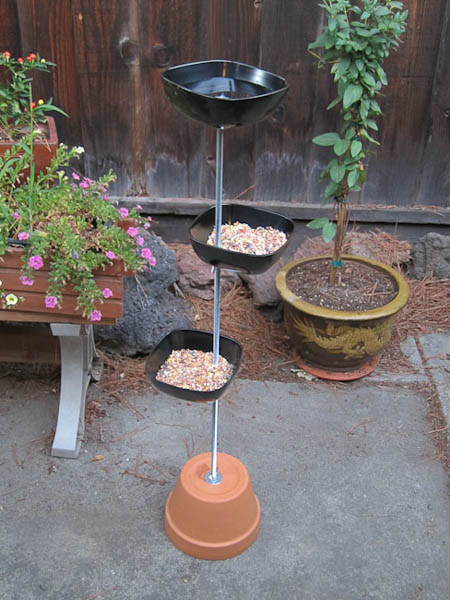
Once the caulk dries, your bird feeder is ready to go!
Place it outside, and fill the bottom 2 bowls with birdseed and the top one with water. Now we just wait and see if any of the local wildlife come by to check it out!
And look: birds!