I just made my first Robe a la Francaise using JP Ryan’s Pet en l’Air pattern and if you’re not familiar with this style of historical dress (which I really am not), assembly can get very confusing. So in hopes of helping out the next person who is trying to make one of these gorgeous dresses, I assembled my notes and in-progress photos.
This page is going to be a work-in-progress with hopefully more updates as I get better at this style of dress because I am planning to make a few more.
Disclaimers: I am just a hobbyist so I’m sure to be getting things wrong and using the wrong terminology. I totally welcome comments on what I’m doing wrong!
So here we go…
Lining
I don’t have any photos of this part because it’s pretty straight forward to follow the directions.
The only thing I would note is to remember that the liner will be flipped inside out before being attached to the dress so that the finished side will be against your skin. Don’t do what I did and sew everything inside out, like the adjustment tapes… those go on the wrong side of your liner so that when the dress is finished, they will be between your liner and your dress.
So there was my first mistake which you will be able to spot in later photos. =D
Dress Front
Putting in the pleat on the front was by far the most confusing part of the whole dress for me. After much staring at museum photos and photos that JP Ryan sent me, this was the way Judy and I decided to do it.
So here is my pattern piece with my new fold order numbers. The marked side of the pattern is the right side of my fabric.
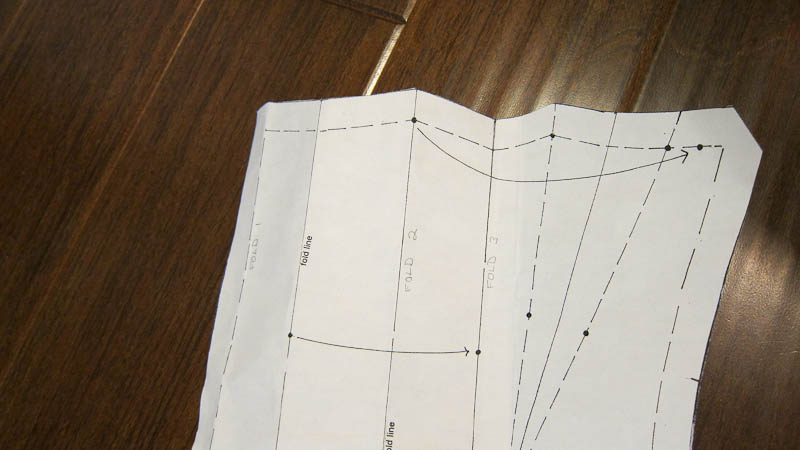
- Sew the dart and press it flat.
- Press under the seam allowance at fold line #1.
- Fold everything to the left of fold line #2 under so that you now have a facing on the inside.
- Take the edge of your fabric (that was created by fold line #2) and fold it back over the front of your piece on fold line #3. Fold line #3 is inside the fabric now.
That was probably a bit confusing so here are some photos that will hopefully help. This is my finished front piece. Note the pleat in the front that covers the dart.
 Here is the front piece with the pleat flipped open so you can see fold line #3.
 Now I’m going to flip over the front piece so you can see the wrong side.

And here is the inside pleat flipped open so you can see the seam allowance which was fold line #1.

I decided to make my front pleats go all the way down my dress, like on this historical example. Judy, who was also making the same dress in a different color, opted to have her pleats stop and fall open at the waist. We knew we were going to be covering it all in trim anyways so it didn’t really matter. Let’s just ignore the part where we didn’t get finish the trim for our first wearing of these… =D
Dress Back
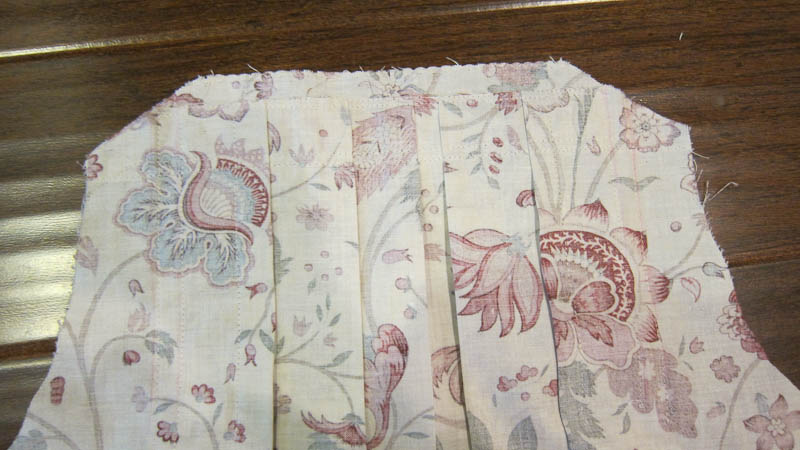
The back pleats are (as the instructions say), easier than it looks. The only thing to remember is that you want to copy the markings on the pattern piece to the right side of the fabric. I’m so used to copying marking lines to the wrong side of the fabric that I started doing my pleats on the wrong side of the fabric initially.
The step after the pleating is to stitch a line across all the pleats along the stitching line and then again 1/4″ below it because you’ll be trimming off the fabric at the stitching line. I also put in a line of basting stitches about 1 1/2″ down to hold the pleats in place.
For the yoke (or the back neck piece): press under the bottom seam allowance, and then lay it on top of the pleats and stitch it down at the base. The top of the yoke is folded over encasing the pleats at the top after you trim off the seam allowance.
View of the back piece with the yoke attached.

View of the back pleats under the yoke.

The back piece flipped over. It’s a little hard to see but if you look closely, you can see where the back pleats were trimmed at the 5/8″ stitching line. The yoke extends past that and is eventually folded over to encase the raw edge of the pleats.
The rest of the back assembly is fairly straightforward.
Sleeves
I didn’t realize this until someone asked me about it, but in the larger size patterns, there is a dart in the sleeve. I’m not sure at what size the dart starts showing up, but I have a size 10-12 pattern and there is no dart in the sleeve. There’s no mention of the dart in the instructions but I asked Judy about it, and she said she puts in the dart before attaching the flounces. The flounces will eventually cover the dart.
Also, you might want to consider putting in the under sleeve flounce first for convenience. You can see my notes on attaching the sleeve flounces.
Skirt Pleats
The side pleat instructions are kind of confusing but all that’s really going on is that they side panels are being folded accordian-style into 2 sets of pleats that meet at the side opening.
You don’t need to press the pleats; they should actually be “loose” so they can shift around with the dress. Yup, guess who pressed their pleats down? =D
Also having the 2 sets of pleats meet very closely at the side opening, or even overlap a little, is good because when that opening falls open, everything underneath it shows.

Attaching Lining to Dress
This is the part where it is very good to have a friend to help with the fitting.
Try on the liner and adjust the ties in the back to fit and and make any other adjustments necessary. In my case, I needed to take some fabric out of the front pieces so I put in a dart.

Pin the liner to the dress along the neckline and down the front. As I mentioned before, I put my adjustment tapes on the wrong side of the liner which is why you can see them now. You can also check out amazing grommeting job. It looks like I did them while drunk… ^^;

Try on the dress and lace up the front and here’s where you use the greatest costuming accessory ever (i.e. your friend). Have her help you pin the sides down so that the side pleats are anchored to the liner. I had Judy help me do the fitting and then I put my dress on my dummy to snap photos.
Here’s the side view.

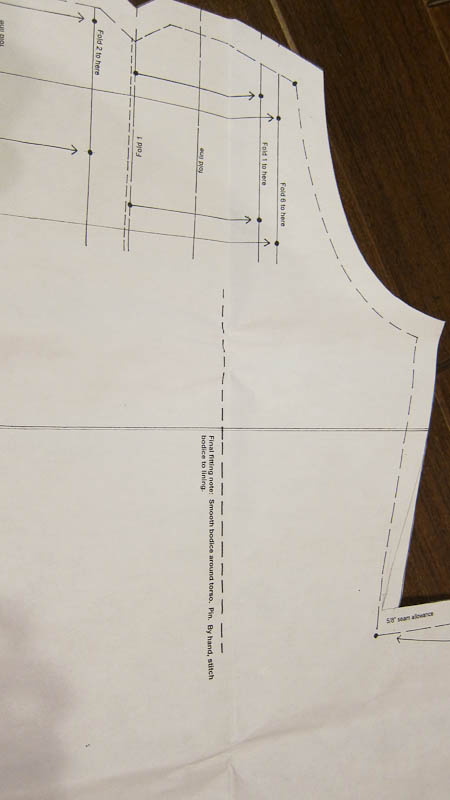
You can also chose to tack down the back. According to the site, marquise.de, early robes were not fitted to the waist so these steps are optional but the JP Ryan pattern has a fitting line along the back. I didn’t see it mentioned in the instructions but it’s on the back pattern piece.
Here’s the back of my dress pinned down to the liner.
 I hand-stitched everything in place and here is the final result on my dummy.

Sleeve Flounces
The under sleeve flounce is usually cut from lace and goes inside the sleeve. On hindsight, I would add the lace before I set the sleeve into the dress because it’s a total pain in the butt to wrestle the lace into the sleeve while it’s attached to a huge dress. The under sleeve flounce (the lace layer) goes inside the sleeve and the other 2 flounces go on the outside of the sleeve.

We had to double layer our sleeve flounces because the inside shows and the wrong side of our fabric was very obvious. Most other francaises I’ve seen have been made from materials like silk taffeta that don’t have a wrong side so there’s no need to double layer.


Stomacher
The stomacher needs 4 channels for polyboning.

If you’re really on top of it, try to have your stomacher done before your friend comes over to help you with the fitting. Then she can help you pin in the stomacher to see how it looks. Judy also showed me a trick where you take a piece of tracing paper and have your friend trace your stomacher so that you know exactly how much will be showing once everything is pinned in. That way you know how wide to make the bows that decorate the stomacher.

Petticoat
It took Judy re-iterating to me a couple times before I finally managed to make it stick but the petticoat on a francaise is the actual skirt. I found it really confusing because in modern day terms, a petticoat goes under a skirt and isn’t seen.
The pattern has a bunch of math to calculate how much fabric you need for the petticoat. That part went ok for me. The confusion started when I was trying to follow the directions to assemble it all. I’m going to go step by step following the numbers on the pattern in the “Layout and Cutting” section for the petticoat, and add my little footnotes.
1. Lay out material – ok that part is pretty straightforward
2. This step is how to cut the fabric if you are using 54″ or wider.
3. This step is for how to cut if you are using 45″ wide fabric. The waistband cutting instructions threw me off a little so I just went with cutting 2 3″ wide strips for my waisband and then used the rest for the skirt.
4. This step is how to calculate how much to take out of the waist seam so that the skirt falls evenly once it’s over the pocket hoops.
5-7. These steps only apply if you are using 54″+ fabric. If you are using 45″, you already did all your panel cutting and assembly of the skirt. Basically if you have 54″+ fabric, cut it in half. If your fabric has nap or a a pattern, make sure it is all facing the same direction before you sew the panels together. The step to sew the panels together is actually later but you can do it now, just remember to leave 10″ on each side open.
8-11. These steps walk you through how to use your droop calculation from step 4 to cut out a section of the skirt panel.
12. If you have 54″+ fabric, mark 10″ from the top and this is where you will stop stiching. If you have 45″ fabric, slash the fabric down 10″ and finish off the edge. You need this opening in your skirt so you can get to your hoops. After all, what’s the point of having pocket hoops and actually having somewhere to store your cell phone and wallet if you can’t get to it?! =D
After this, it’s just pleating and gathering the skirt on to the waistband. Here is a shot of the front of my skirt.

And here is a shot of the back of my skirt, with the inverted box pleat in the middle. I’m not sure what the purpose of the inverted box pleat in the back is. Maybe it’s there so you can tell which panel of your skirt goes in front, and which one in back?

A side note: if your fabric is expensive, it is actually historically accurate to use a cheaper fabric on the back panel that no one will see. Here’s an example from the Met.
And after this, it’s just trim! Which I have yet to do so I need to get working on that! =)
Hope you found this somewhat useful and feedback is always welcome!


 Now make a fabric sandwich with the backing fabric, the fusible fleece, and front fabric. Pin the layers together.


