I’m making Moana costumes this year for Halloween, so I thought I’d do a series of Moana costume tutorials on how I am modifying the official Disney costume.
To start with, I decided to re-make the top. I really like how the skirt looks, but I don’t like how the top requires straps to stay up and the top edge looks wrong. I figured it can’t be that hard to make a new top that is actually a tube top and has a shirred back for fit.
Today’s tutorial is on how I created the fabric for the top.

I used a freezer paper stencil to paint some linen fabric I got from Joann. (FYI, this orangish red color Moana has going on is kind of hard to find.)
I posted my stencil pattern for anyone who wants to use it. It’s 7″ high and is sized to fit a 4 year old (approximately). You can adjust it by shrinking it or blowing it up when you print it out.
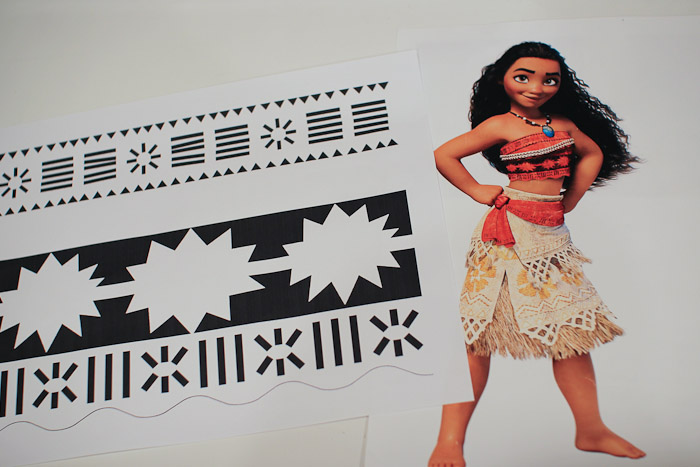
I have no idea how one actually uses freezer paper in the kitchen, but I’ve seen quilters use it for stencils and appliques. It worked perfectly for this project!
I took a piece of freezer paper, laid it shiny side down, and taped my stencil printout to it. Using small scissors and an x-acto knife, I cut out the black sections. It took a while and was very very tedious.

(I forgot to take a photo of the stencil after I finished cutting it out.)
After my stencil was cut, I laid out my fabric on my ironing board and drew a horizontal line as a guide. I laid the stencil shiny side down against my guideline and ironed it. Freezer paper melts a little under the iron, and sticks to the fabric which is why it’s perfect for stenciling on fabric.
I suggest doing some tests with some scrap fabric to see how much heat it takes to make the freezer paper stick as every iron is different. I would also use a press cloth between your stencil and iron so paint doesn’t get on your iron. My ‘press cloth’ is just whatever scrap piece of cotton fabric I have laying around.

Once my stencil was stuck to my fabric, I painted in the stencil. I used a foam brush and black acrylic paint mixed with fabric medium. Try to remember to put something under your fabric before you start painting or you’ll end up ‘Moana stripes’ all down your ironing board like me. =P

I like to peel the stencil up while the paint is still slightly wet and then let the paint dry. Once the paint was dry, I moved the stencil over to the next spot, and repeated the above steps until I got my desired fabric length.
(Sorry, no photo of the painting step. I get very heads down on my projects and I forget to take photos until after and then it’s too late…)
The stencil can be re-used many times. I was able to use my stencil over a dozen times. (I painted the belt fabric using the same stencil.) The painting gets less clean the more you use the stencil, but it’s supposed to look rustic!

After I finished, painting, I traced the bottom wavy edge on the stencil and cut along that line.

I debated between fray checking or serging the bottom edge, and decided on serging a narrow hem because I didn’t want anything scratchy up against the Grub’s skin.
I was really pleased with how the fabric came out!
Moana costume tutorials:


